Tuesday, June 30, 2009

I am Canadian...Happy Canada Day!!

Although I began my life far across the ocean in Northern Ireland - and I am Irish, first and foremost - I definitely identify as a proud Canadian. I love that my country is a wide expanse of terrain that changes dramatically as you travel from east to west. Rich culture, diverse cities, prairies, staggering mountains, two oceans, the Niagara Falls, and the northern territories...a trip across the country is one I plan to take someday, and I look forward to acquainting myself with the beauty and wonder of this country I call home.

It may seem smug, but I think we can lay claim to some of the most talented singers (Celine Dion, Shania Twain, Bryan Adams, Nickelback, etc.), comedians (John Candy, Dan Aykroyd, Jim Carrey, Mike Myers) and designers (Debbie Travis, Candace Olsen, Sarah Richardson, Karim Rashid, Patricia Gray and more!) in the world. Like I said, I am proud to be Canadian, and when I sing our national anthem, I feel such a rush of that pride.


Canada Day, for us, always means fireworks, a parade, a few tattoos, outdoor games and a barbecue with all of the trimmings (thanks to well-organized and generous friends!). While the boys have outgrown their tolerance for donning a matching red, Canada Day t-shirt, Sophie is still game and wears the maple leaf with pride!
To my fellow Canadians - and as those of you south of the border head into your own Fourth of July celebrations - celebrate and enjoy what your country means to you. Fire up your barbecue and submit to a (temporary) patriotic tattoo or two. Fly those flags high and take a moment to reflect on what your country means to you.

Happy Canada Day, one and all!!

Take a Bow Tuesday


I don't mind saying I am struggling with this commitment thing. I am not a blogger who does well with an organized posting schedule. True to my nature, I am a bit of a fly-by-the-seat -of-my-pants kind of blogger. When a thought or post idea pops into my head, I start writing. Still, I am bound and determined to stick with my Tuesday feature of honouring my talented blogging friends.


And here is this week's edition:
Now, please go and visit these bloggers and enjoy the view!!
***************************************
Stay tuned till later in the week, when I announce some very exciting news. I'd love to hear any guesses...and no, there is absolutely no baby involved!!

Squares and stripes

First of all...bear with me. This is my sister dancing with Donnie. (About 30 seconds in.)

Warning: Turn down the volume unless you are a fan. Lots and lots and LOTS of screaming:

http://www.youtube.com/watch?v=Z7Qth0Rp0Jo

Sniff. I'm so proud!! Oddly enough, she was only up there for 20 seconds or so. It felt like four minutes while we were there. This is a good thing, because it means I was only standing there frozen like a total dweeb for less than a minute. Good stuff.

OK, so let's move on. The long awaited squares and stripes post, which works well for this time of year (stars and stripes...get it??). It's really not rocket science, and yet again, there will collective "DUH." when you're done reading, but I like to share so I'm sharing. OK? OK.
First, the squares. The two items you must have for squares and stripes is a level (either the one below or a laser level that sends a beam of light straight down the wall) and blue painters tape. For this wall, I used two inch painters tape for the whole wall. I used the white wall as the background, but if you want a color, you'll need to paint it that color first.
Then, the measurements all depend on the size of squares that you want, or how many rows/columns you want. Say your wall is 127 inches -- and you want six columns of squares. You'll subtract two inches for each end of the wall, and each two inch space between each column -- basically each spot the painters tape will go.

Like this:
127 inch wall
six columns equals seven two inch sections (on each end of the wall and between each column)
7 sections x 2 inches (for painters tape)=14 inches
127 inches - 14 inches= 115 inches
Now divide 115 by six (for six columns)= each column would be 19.16 inches wide.

Do the same for the rows up and down as well. I know I made this seem complicated and it's really not that bad. It may take you a few tries to get the right measurements -- it did me. The rest is easy, it just takes time.

I hope that made sense! After you've figured out your measurements, you'll just need to measure off your wall. I use a yard stick, with the measurement marked, and I keep moving it down the wall, marking, say, 19.16 inches up and down the wall. Then take the level and use it to make straight lines on the wall vertically and horizontally.

Take your blue painters tape and run it along the lines. You can use the laser level and put the paint along the laser line, (this is how I do it) or you can put a light pencil line down the wall and then tape that off. To make sure no paint bleeds under the tape, I've heard many tricks, but all I do is take my thumbnail and run it down each side of the tape. You can also use a credit card or pan scraper. It works every time for me.

For stripes, my little trick is to use the yard stick again. In our son's room, I wanted the stripes in different widths -- two, seven, three and five inches. I did all the painting before the chair rail was put up, so the top of the stripes doesn't have to be perfect. Before I started, I marked the measurements and colors on my yard stick, and then used the painter's tape to hang the yard stick on the wall:


Using the marks on the yard stick, I used the level and painters tape to put the stripes down the wall. With stripes, you can't do all of them at once. My wall was cream, so that stripe was done. I had to paint three other colors, so I did the dark and medium green first, let it dry (I did NOT wait as long as they recommend and you don't need to) and did a quick second coat. Then I pulled off the tape and the next day did the third, lightest green by reapplying painters tape on each side of that stripe and painting:
Of course, the more colors, the longer it takes. It seems complicated and again, it's not. The great thing about varying stripes is you don't have to measure the wall like with squares. Just figure out what look you want and go. Once you get going, it will go surprisingly fast. Surprisingly. Swear. Pinky swear.

I taped off most of the stripes in my son's room within a couple hours, and the total paint time was probably a few hours.

I did stripes on one wall in our bedroom as well:
This was done by just painting the wall the base color, then taping off one foot columns and painting a shimmer glaze over the base. It's a really subtle look and I absolutely love it.

My biggest tip when using painters tape -- take the tape off when the paint is still damp if at all possible!! I've heard from professionals to keep it on till the paint is dry, but when I've done that, it makes a mess. The lines turn out awful, because the tape pulls up little pieces of the paint. When it's damp the tape comes right off, leaving a clean line.

If you have any other tips for a clean line or painting stripes/squares, please leave them in the comments! I know many of you have textured walls and I know it can be done, I've just never tried it. ;) I appreciate any other thoughts!!

It takes some patience, but the result is so custom and beautiful, you won't regret it!

P.S. I went to the best antiques shop in Indiana today and whoooeee, I have some eye candy for you later this week!! If you follow me on Twitter, you have already seen some of them. Fabulous!!!

Monday, June 29, 2009

It. was. awesome.

Oh my goodness people. I cannot even tell you how. much. fun. we had last night. I'm not even kidding. It was the time of my life!!! First, some pictures, and then you'll just die at the story at the end!!!!

Our seats were AWESOME, thanks to a former coworker of my sister/second cousin of my best friend (long story). We were right behind the sound stage. Thank God I'm 11 feet tall:

I kept standing on the railing around the sound stage, making me about twelve feet tall. The security guys were giving me the stink eye and a stern "GET. DOWN." look quite often. Whateva dudes. I waited 18 years for this:
Jared the Subway guy knew someone in the band and sat right in front of us. My goober adorable best friend and sister got pictures with him:
We went ALL OUT and got a limo -- here's a few shots. Me and my sis:
My hawty hawt shoes:
(Yes. I have blisters.)
My and my BFF. We've been best friends for about 23 years. Five NK's concerts together, and I wouldn't want to go with anyone else:
And a self portrait with the massive crowd behind us!!
So GET THIS. Before the show, my BF is Twittering Donnie (to my fellow twitterers (?) I'm sorry for the goofy posts last night!) and just to be funny, I twitter him our section, row and seats and tell him to come out to see us (we heard earlier that they come out in the crowd.)

Later in the show, the lights go down and all the sudden the guys are all spread out in the crowd. Donnie is immediately to our right, about five feet away. My sis and BF are over there in two seconds. I turn around and Joe is to my left, about five feet away as well. The seas parted and crazed girls grown women went screaming to each side of me. I stood like a goofball right smack in the middle, by myself, freaking out -- which way to go???

I was frozen. I couldn't decide. (Ladies, they were both smokin' hot. Smokin'.) I look over to the right at Donnie and there's this cute chick dancing with him, and I'm like, oh, she's cute! Oh, I hate her. Oh, she's cute though. But oh wait, look, there's Joe! Right there. Geez, that girl is still dancing with Donnie! I still don't know which way to go. Frozen.

I look over again...it hits me....
MY SISTER IS DANCING WITH DONNIE WAHLBERG. Wait. What? MY SISTER IS DANCING WITH DONNIE WAHLBERG!!!!!!!!!!!!!!!!!!!!!!!!!!!!!!!!!!!!!!!!!!!!!!

It was the most surreal experience of my life. I run over there, get on a chair and am about three feet from Donnie, eye level....

And I don't have a camera. Nothing. My phone had long died, I didn't bring in my camera, I had no idea where the other cameras were. I could have gotten the most amazing pictures of Joe and Donnie if I had one. I am hating myself right now!!

I don't even know if they get twitters from fans, but we thought it was so odd that he ended up right next to us. :) It was fantastic. My best friend has been a Donnie fan for 20 years and held his hand. We felt like we were 15 again, only better. :) It was the best concert I've ever been to, hands down. There are only about ten more concerts -- if you are not sure about going -- you MUST. You won't regret it. They know how to entertain!!

Thanks for letting me gush!! I feel like you are all my friends, so I had to share the night with you! And a big thanks to those of you who could care less about former teeny boppers for putting up with me lately. I swear, no more about it -- back to painting, crafting, decorating....I promise. :)

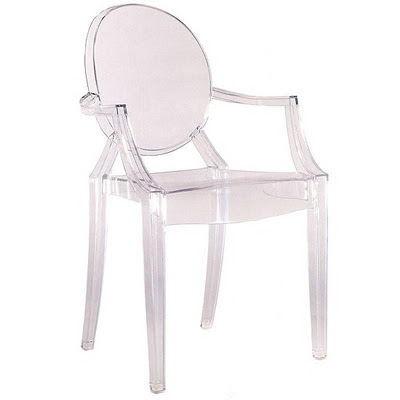
Ghost Chair Metamorphosis

Kartell

The Phillipe Starck Louis Ghost Chair is really beautiful.
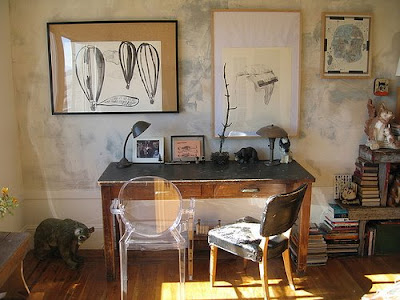
We are seeing it everywhere.

flikr
Here it is used in the most common way as an accent chair - totally unadorned. Lovely, but because it is getting so popular, not as unexpected in a room as it used to be.

Casa Sugar

Perhaps in an effort to reinvent it, the set designers for Gossip Girls had pads made for the chairs. I really do not like it, I think the chair loses some of its ethereal quality.

c.everad
But this recent make over stopped me in my tracks. I was taken by the incredibly classic form of the chair floating under the gauzy sheer slipcovers. Isn't this combination fantastic?


I would use this slipcovered chair in any number of rooms! What do you think?


Check out other makeovers on Monday Metamorphosis at Between Naps on the Porch

Sunday, June 28, 2009

Modern Fashion Interior Decoration


Modern Fashion Interior Decoration
Others subdivisions include architecture, interior design, industrial design, and so on and so on. I think that philosophy behind design unites these, and I have found that many people who are into fashion love it because of the design aspect, because it represents not only a material object, but an object, and moreover an expression, of beauty, quality, craftmanship, involvement and care. The same is present in interior design.

Today I found an incredible lighting piece which I will probably get for our living room. It is made by a Dutch designer Frans Van Nieuwenborg, and I was in awe of its beauty-in-simplicity. All it is is a piece of fabric that covers a light bulb, but it provides an airy romantic effect.

Interior Door Basics Styling


Interior Door Basics Styling
Doors do more than open and close. There are part of a home's décor, a buffer between one space and the next. It stands to reason, then, that door purchases should weigh heavily in the home construction budget.

Door Form and Function. A door, whether it is solid, glass, louvered, or half glass, should complement the surrounding décor, and ornament the wall on which it lives. At the very least, the style of the door should complement existing accents like moldings and trim. A raised panel wood door finished in a natural stain is a bold accent when fitted into painted trim. Homeowners typically choose stained wood doors to complement stained trim, painted doors to accent painted trim. Mixing these styles brings great attention to both, and places great focus on the door, its styling, and finish.

Doors are a substantial portion of any building or remodeling project. While it may break the bank to spend 300 dollars per door, there may be areas of the home that need high-quality profiles, finishes, durability, or sound-deadening qualities. First determine which doors have a decorative function in the home. Select a door that will complement the furniture, moldings, and style of the rooms. Determine whether these doors need to be wood, wood surfaced, or paint grade, then budget accordingly. Next evaluate which rooms require doors with sound-deadening capabilities. Again determine whether they need a natural wood face or whether a stain-grade product would serve as well. Finally, decide which doors are strictly utilitarian and can be served by flush or hollow-core doors. This approach will help you determine how to best budget for the doors in your home while making a decision you can really live with.

Just Passing Through...


While many of us focus our energy (and budget) on decorating the major living spaces of our homes, how many of us actually focus any attention on the hallways, corridors and foyers of our homes?Indeed, few of us are lucky enough to have large hallways that can be adorned with artwork on the walls and where children run carefree for more than a few feet. Still, the hallowed halls of our homes are the perfect spot for the following accessories and/or details:

Family photos
Collections, on shelves, in shadow boxes, or simply hung on the walls

A beautiful clock, to be glanced at as we hurry about our day

A gallery of our children's artwork, either framed or clipped causally onto dollar store clip boards

A great mirror to sneak a peak at our frazzled reflections as we rush out the door

A smart, stylish rug

Wallpaper, for those hesitant to "try it again for the first time" anywhere else:


A chalkboard wall, for those gutsier homeowners:
(photo: Wish magazine)


functional built-ins:


A mural, or other fun wall treatment (like this decal):


Architectural detailing, like this panel moulding:

Walls painted in bold, snappy stripes:

Or kept simple but highlighted by a fabulous lighting fixture:

So, as you walk down your hallway, don't just pass on by a great opportunity to decorate the passageways of your home. Look at them differently.

Because, as we all know, sometimes the journey can be so much better than the destination...

*****************************

(all photos, unless otherwise noted, from House to Home UK)

Home Interior Door Finishes


Home Interior Door Finishes
Doors do a lot more then just open and close. They represent a huge part of your interior design. Doors blend together one space of your home with another. For this reason, it is important that your doors not only serve their intended function, but also create a decorative flair to your interior workings. In general, homeowners choose stained wood doors to complement stained trim and painted doors to accent painted trim. What they don’t know is that by mixing these styles you can bring great attention to both. Mixing also places great focus on the door, its styling, and finish.

Painting is an easy way to compliment a room's colors. There is a virtually endless selection of colors for you to use. The best candidates for paint include cheap hollow-core doors with wood that looks marred or flawed and also old doors with paint that resists strippers. Keep in mind, painting can become more work than staining because of its messiness and tendency to drip. This is especially true when painting panel doors. With a wide range of wood oils, waxes and varnishes, new or old doors can be transformed adding character and style to your home.

Varnishes: Wood varnishes provide the strongest finish for interior doors. Available in matt, silk and gloss they offer the smoothest finish and the highest level of gloss,although satin and matt are available. Varnishes are not as easy to repair if a small area gets damaged.

Wood Oils: Wood oils offer interior doors good durability and water resistance. Producing a soft sheen, wood oil finishes are very easy to repair if they become scratched or damaged.

Wood waxes: Wood waxes are easy to apply and produce a pleasing traditional look on interior doors that can be buffed to a good shine. Waxes do not provide a strong finish but are easily repaired if damaged or scratched.

Best French Doors and Room Dividers


Best French Doors and Room Dividers
We manufacture our louvered doors the same way we build our interior and exterior shutters. Our louvered doors are crafted with solid wood, stile and rail construction and are both functional and stylish. We combine old-world craftsmanship and the precision of modern technology to create custom interior doors that will leave a lasting impression.

The honeycomb companion to standard honeycomb shades. Ideal for sliding glass doors, wide windows, French doors and room dividers.

Beauty Interior Folding French Doors


Beauty Interior Folding French Doors
A Door is a moveable barrier used to cover an opening. Doors are used widely and are found in walls or partitions of a building or space, furniture such as cupboards, cages, vehicles, and containers. A door can be opened to give access and closed more or less securely using a combination of latches and locks. Doors are nearly universal in buildings of all kinds, allowing passage between the inside and outside, and between internal rooms. When open, they admit ventilation and light. The door is used to control the physical atmosphere within a space by enclosing it, excluding air drafts, so that interiors may be more effectively heated or cooled. Doors are significant in preventing the spread of fire.

They are also used to screen areas of a building for aesthetic purposes, keeping formal and utility areas separate. Doors also have an aesthetic role in creating an impression of what lies beyond. Doors are often symbolically endowed with ritual purposes, and the guarding or receiving of the keys to a door, or being granted access to a door can have special significance. Similarly, doors and doorways frequently appear in metaphorical or allegorical situations, literature and the arts, often as a portent of change.

If you have not yet considered installation of sliding folding French doors but are strongly considering the possibility, then this is a decision you won't be disappointed with because there are several main benefits for installation of such doors.
 
coompax-digital magazine