Showing posts with label living room and foyer. Show all posts

Monday, February 14, 2011

COLOR! (in the living room)

First of all, Happy Valentine’s Day my SQUEEZIES! :) Hope you had a great one.

I’ve been working on some changes in our living room over the last couple of weeks, and I’m nowhere near close to done, but I just couldn’t wait to show you! I am LOVING how it's turning out -- so excited.

I don’t know if it’s the three inches of ice that have finally melted off our driveway (for the first time in two weeks), or the warmer temps we’re getting this week that is giving us hope for spring, or maybe it’s because the cat peed on the drapes…any one of them could be the reason for my spur-of-the-moment decision to make some changes to our front room.

What’s that? Hmmmm? Oh yeah…I skipped over the pee cat thing. She was off her meds for two long and the inevitable happened. This time though…I’m GLAD. Because that’s actually what started this ball rolling. See – pee cats are good for something! (And she’s really sweet and loving and yada yada…)

Anyhoo, enough mentions of pee for one post. Onward! It started when I took a drape down to wash it, and it just spiraled out of control from there.

For the past year or so, I’ve been trying to add more color to our living room. It looked like this back in the day:

before, before

OK, well there’s been color – it’s just been one color. Red. :)

And then I made a few more changes and it looked like this for quite some time:

before, living room

Notice the trend? DARK. A ton of dark peices and accessories, and red fabrics – ONLY red. You see, for the longest time I thought our wall color was hard to work with. It’s called Beechwood Grey from Porter, and I like it – but for a long time I just felt like I needed to match it, you know?

So red was the direction I went…and I liked it for a while. But my style…it is a changin’.  :)

And taking that one drape down kind of got my wheels turning. I noticed how much brighter it got in the room with just the one panel down. So I took another down…and another…and you get the picture.

The front of our house doesn’t get direct sunlight, but you wouldn’t have been able to tell – the room was positively glowing. And I was in luuurve.

That’s what started the ball started rolling – and the wheels in my head churning. First up was to trim out the windows like I showed you here. I’ve slowly but surely done this around the house, and I’m about half way through the windows now.

And then, since I was going to paint the sills and everything around the window, I went ahead and recaulked both of them:

caulking windows

I didn’t even keep it clean and pretty, because I knew I was painting over it all in white.

And that I did – the new trim and drywall around the windows was painted out in glossy white. See how this started with a little bitty thing and got HUGE? :)

Then another idea came to mind. I love love LOVE my free sewing cabinet and Ballard-esque cafe shelves between the windows, but they have seemed so HEAVY to me lately:

red drapes

(The iron snowflakes hanging in the windows that I tried to convince myself didn’t look like snowflakes have been gone for a while. They are now packed away in the Christmas decor. Cause they are snowflakes.)

Anyway…I’ve always felt like I needed something more substantial between those windows.

So I took it all away:

(I had just wiped down the wall – hence the dark marks.)

I contemplated leaving those windows nekked by the way, just like in our kitchen. I was smitten, I tell you. 

But then…then, I found THIS:

calico corners fabric

I was perusing Calico Corners last week (I hadn’t been to the fabric store in forEVER), saw this and couldn’t get it out of my head. It had COLOR – so many beautiful colors. And I just thought the print was stunning.

I couldn’t resist it. And I’m so glad I didn’t. Cause now that dark room looks like this:

living room after, almost

Now, I’m showing you in between pics here – keep that in mind. I like to show the process of things so I really wanted to show you the progress thus far.

I think it’s a dramatic change, yes?:

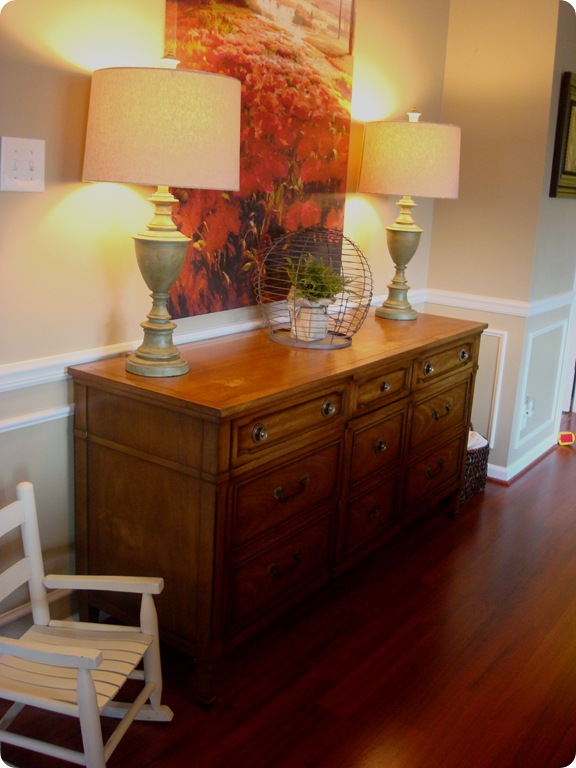
That dresser has made the rounds around our house. It was the Bub’s changing table forever, then it moved to the office, and then it was in the basement for a while.

I made hubs drag it up the stairs to see if it would work and I fell. in. love.

Do you see how differently the wall color photographs? It drives me a little batty. It’s looking way pink in these pics, when it really has more of a greyish tint like in the nekked window picture above.

I’ve mentioned before that we don’t use this as a formal living room – we use it constantly. So the dresser is going to be fantastic storage for puzzles and other activities we do out there:

I have a Goodwill lamp that’s almost ready for the left up on top there. The beautiful wood crate? HomeGoods baby! (For $16!) Doesn’t it looked like I plucked it out of an antique store? LOVE that color too.

One of the things I’d love to do, especially now, is to get a slipcover made for the chair and sofa:

But even without covers, I love them SO MUCH MORE in this room now. It’s just crazy – I don’t know why, but they don’t bother me nearly as much. (But I AM going to slipcover. Oh yes…I am.)

I have a plan for the wall above the dresser too – I already have everything I’ll need. Can’t wait to get it up there!:

living room with color!

And yes, there ARE about 50 holes in that wall from the various changes I’ve made to it. :) They’ll all be covered with my plan. I’m not even gonna fill them. Buwahahaha!!!  :)

I’m hoping to get the rest of the changes made to this part of the room by the end of this week, so I’ll show you as soon as I’m done. There’s some other stuff I’m working on elsewhere in the space too, but that is going to take a bit longer.

But for now…I simple cannot believe the difference a little editing and new drapes made…the before:

And after:

WHOO, swoon, ACK…Happy Valentine’s Day to ME…I am love! Ha! :)

Can’t wait to show you the rest! So far it’s turning out just like it looked in my head…just hope the rest of it does. (I love when that happens!)

P.S. I have not even hemmed the drapes yet…that’s how not completed this room is. Did I mention I have little to no patience?? :)

Like my version of the Ballard Designs cafe shelves?
You’ll LOVE Knock Off Decor!

Monday, August 16, 2010

Jewelry for your furniture

017Often I think it’s the little things that make a big difference when decorating – or maybe I should say little splurges. :) Things like decorative pulls and light switch covers make me smile. But they aren’t cheap, and they certainly aren’t a necessity, so I add them as I can.

One of my favorite little details are pretty knobs. You can absolutely transform the look of a piece of furniture with just new hardware. So reeehealy, when you compare buying new furniture to buying a few new knobs, that’s not really a BIG splurge, eh Dave Ramsey? Wink wink. Nudge nudge.

I showed you the fab selection of knobs and handles at my local True Value:

hardware

Excuse me while I wipe the drool…

Recently I was on a mission to find just the right knobs for my Craigslist buffet in the foyer:

I found the most beauteous glass knobs at True Value and they made a HUGE difference on this piece:

glass knobs Ohhh, aren’t they lovely? It’s all like PAAAADOW…I’m all glassy and crystally and shiny and you can’t take your eyes off me, gorgeous!

All that glitter for five bucks each. Whoooohoo!

One thing to watch for when you change out hardware is how the finish looks underneath. Sometimes if knobs are installed too tightly, they will damage the wood.

The person who painted my buffet (before I bought it) put the knobs on before the paint had cured. So they were practically glued to the drawers. (I had to take a hammer to a few of them!!)

I still need to touch up the paint around some of the new knobs because of that:

The brass hardware on my other recent Craigslist purchase is actually quite beautiful:

083

Yes, you heard me right. I just said brass was PRETTY. It’s the antique looking brass though, not the blinding shiny stuff. :)

I found some brass polish at True Value and went after these beauties with an old tooth brush:

The old finish is on the left, the cleaned finish is on the right:

Loverly! Not all of them cleaned up that well, but I’m just chalking it all up to the beauty of an old piece.

Obviously, I’ve had a bit of a Craigslist dresser obsession lately.  :) A few weeks ago I picked up a Henredon dresser for our bedroom for only 50 smackaroos (AWWWWESOME!! I’ll show you soon!), so I was moving dressers around all over the house. The old dresser in our bedroom moved to the guest room, and the one in the guest room had no home.

It’s the one from the Bub’s nursery, and it’s just lovely:

Sniff. Sigh. Boohoo…I changed my baby on this dresser for so very long. :)

I knew I wanted to use it somewhere, and then it hit me – with the new table-turned-desk for the office, I needed storage. Why not put the dresser in there?

As it was, it just looked a little off. So I was off to True Value again, checking out their selection. I found just the knobs I was looking for, and then picked up one of these jobbies as well:

I had one of these guides years ago and have no idea where it went – I was SO glad to see they had them! Turns out my hardware screw holes were two inches across, so I none of the holes on the guide matched up. I just drilled a new hole where I needed it, which made it a little harder to keep level. (Ignore the circles – those were reminders for another project.)

Normally you could just rest the ledge of the guide on  your drawer. But I’m difficult. Always. :)

I used the original hole in the drawer as my center, and made sure the two for the new pulls were level by using a small level on top of the guide. Then I marked the spots with a pen and drilled the new holes:

And installed my purdy new pulls!:

Love love LOVE! It makes it look so much more office-y. :)

(Just imagine it without the brick wall color and the cords piled up next to it, and with molding on the wall and all new art and accessories…umkay?)

I lined the drawers with a fun green contact paper:

You know I love you when I show you where I keep my Dymo label maker.

Don’t even think about it.

:)

And would you looky there…room to grow:

It’s going to work great in the office!

Speaking of the new look, I think I found all of my paint colors for the redo at True Value as well:

With white molding, of course. :) Now, I just need to paint. My lazy summer living booty is not looking forward to that…but my fall is coming, let’s get things DONE booty is saying let’s just do it already!!

We’ll see who wins. ;)


*I was one of the bloggers selected by True Value to work on the DIY Squad. I have been compensated for my time commitment to the program as well as my writing about my experience. I have also been compensated for the materials needed for my DIY project. However, my opinions are entirely my own and I have not been paid to publish positive comments.*

Tuesday, July 6, 2010

Before and After Party: Craigslist love

Dearest Craigslist,

So, you know way back when, when I may have said that you give me the heebies? Like, I don’t like strange people coming to my house, heebies?

Well, I take it all back. Well, not the strange people coming to my house part. The part where I acted like I anything-less-than loved you. Cause I do. Very, very much.

You are now my latest BFF. I have many of them, but being the latest one makes you extra special. For about a week.

                                                              Smooches,

                         Me

:)

Do you have spots in your house that always bug you, and you can’t put your finger on what it is, so you just keep messing with it?

I have a few, but the one that got my attention last week was our foyer. I showed you back on this post how our foyer had started out like this:

With a very large Ballard Designs art print (bought on discount at the outlet, whoohoo!) and our hall table. I never seemed right, so I took the mirror from the family room instead:

And I liked it for awhile, but lately I’ve realized what’s been bugging me really hasn’t been what’s on the wall, it’s what’s below it.

Enter Craigslist. (This is where hearts flutter out of my eyes.) I downloaded the Craigslist app on my phone a few months ago, and would play around with it every once and a while. Last week, I looked up dressers, just to see what I would find.

Um, what I found was THREE pieces I thought I may just curl up and die without. Dannnngah! What the heck? Why did I have to find three?

I ended up picking one, but after I got home with it, I realized the length of the dresser was really a foot longer than what the the seller told me it was. Meaning it was MASSIVE and there was no way it was fitting in this space. I put it in a different spot (which I luuuurve and will show you soon.)

But gosh darn it. That meant I may have to try to get another one I loved.  ;) I decided if the one I wanted was still available a couple days later, it would be “meant to be” and I’d go get it.

Well Squeezies, it was meant. to. be. The piece was still there, waiting for me. So it came home with me. And all was right with the world:

Awww yeah, it was PERFECT! But of course, then nothing else was right. The skinny lamp that I had on the hall table was lost on there, and I was craving some COLOR against that black.

So I took this vintage lamp I had spray painted last year:

And sprayed it with a green paint I had in my stash. A new drum shade (stolen from another lamp) and I was in love:

I’m also in love with these two:

:)

I am so into the look of non symmetrical wall displays right now, so I decided to try something similar using what I already had.

I spray painted the frame on some art I’ve had since college:

Then I took some Rub n Buff (can you believe I had never used it?):

And touched up the raised parts:

It was SO easy to use! I love this stuff!

I took an old frame that held an adorable photo of my hubby (that is going in a new spot) and replaced it with part of an old art print:

The greens in the art match the new lamp color perfectly!

The round mirror was too busy for what I was going for – ideally I’d love one with a big, chunky frame, but because I had bought two pieces of furniture within days, I figured it would be best I didn’t spend any more money. My marriage is important to me.  ;)

So I took a mirror from upstairs and added some Rub n Buff to the detail:

And I’m pretty happy with the result, especially for only using what I had around the house:

The piece is actually a buffet, which is exactly what I was looking for in this spot! It has a lovely little curve to it:

I did end distressing it just a tad, just to add some character:

OK, let’s be real here folks. It will get “distressed” around here anyway, so I decided to beat the wear and tear to the punch. :)

It has SO much storage, and storage makes me soooo very happy:

 081

I love love LOVE this buffet/dresser/lovely thing!:

I’m still messing around with accessories, and may be on the lookout for different art. But for only spending money on the furniture, I’m pretty happy with it!:

By the way, the buffet was $160 – way more than I wanted to spend, but I could not get it out of my head peeps! It was love at first sight. And the fact that it was still available after a couple days means it was meant to be for us, me and my Craigslist buffet.  ;)

So, my before:

And my after, thanks to my latest BFF:

Now it’s time for you to link it up! As always, I ask that you please link to your blog post, not your blog address (by right clicking on your blog post, copy shortcut, then paste into the linky.

I would love it if you would link back to my site and use this purdy little button:

beforeAndAfterButton

The party will be open to links until next Tuesday, July 13th. Have FUN and enjoy!

I hope you all had a GREAT Fourth of July holiday!!

 
coompax-digital magazine